About This Drill
AP World History Unit 7 Drill 22 is a Multiple Choice practice drill covering Unit 7: Global Conflict. It contains 5 original questions developed by Brian Stewart, a Barron's test prep author with over 20 years of tutoring experience.
This AP World History Unit 7 drill uses a map of WWI alliance systems to explore the causes and early course of World War I. Questions test your ability to analyze geographic and political relationships, evaluate a historian's qualifications about alliance membership, and interpret how the map's information relates to the war's development.
Passage
Figure 1. Europe and the Middle East, 1914: WWI Alliances
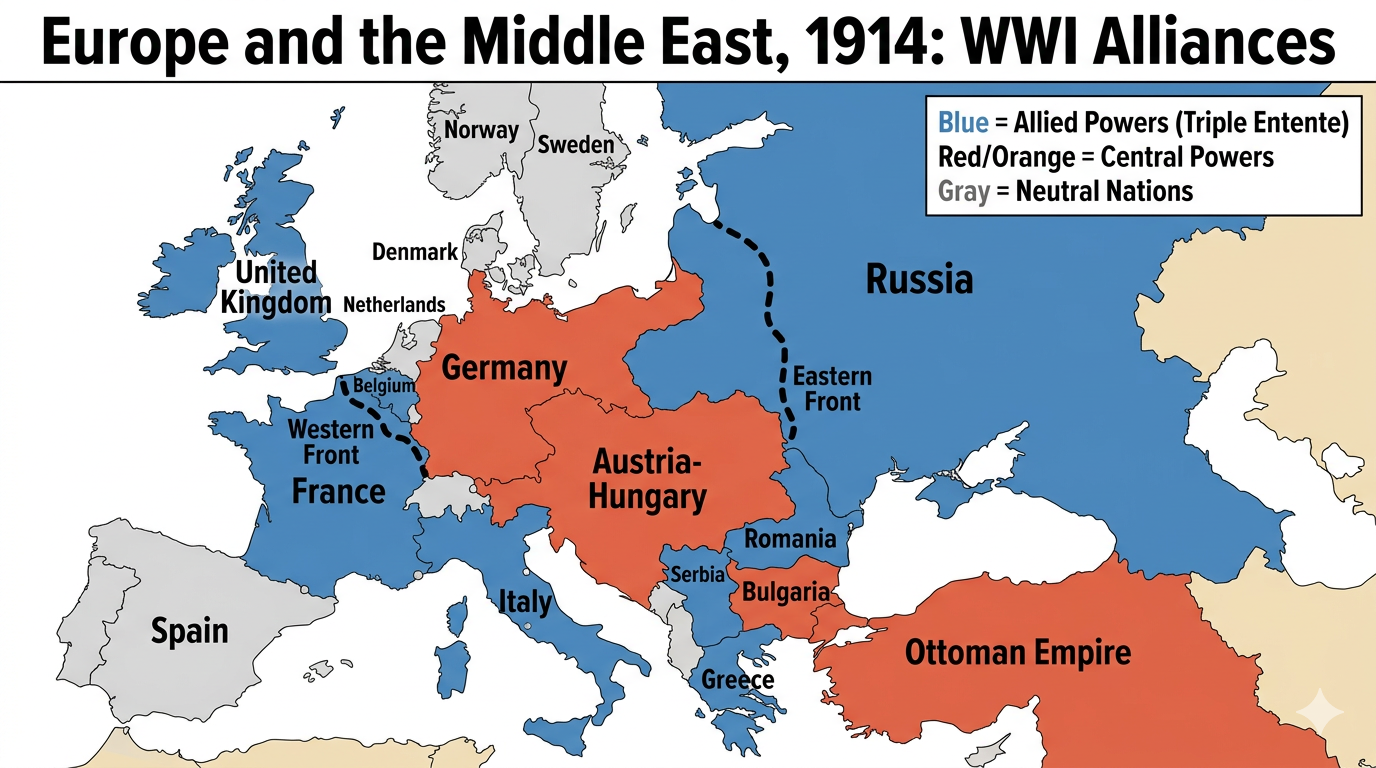
The map shows the alliance systems at the outbreak of World War I. Blue = Allied Powers (Triple Entente). Red/Orange = Central Powers. Gray = Neutral Nations. Dashed lines indicate the Western and Eastern Fronts.
Questions & Explanations
Question 1. Based on Figure 1, which of the following best describes the geographic situation of the Central Powers?
- A) The Central Powers controlled the majority of Europe's territory and coastline, giving them significant strategic advantages over the Allied Powers
- B) The Central Powers were geographically separated from one another, making coordinated military strategy between Germany, Austria-Hungary, the Ottoman Empire, and Bulgaria extremely difficult
- C) The Central Powers had the advantage of interior lines but were surrounded by neutral nations that prevented Allied forces from attacking from multiple directions simultaneously
- D) The Central Powers faced a two-front war, with Allied forces pressing from the west through France and Belgium and from the east through Russia, as shown by the two front lines on the map ✓
Explanation: D is correct. The map clearly shows two dashed front lines: the Western Front running through Belgium and northeastern France (where Germany faced Britain and France) and the Eastern Front running through eastern Europe (where Germany and Austria-Hungary faced Russia). Germany's nightmare strategic scenario, fighting simultaneously on two fronts, is directly visible in the map's geography. This two-front problem was the central strategic challenge that shaped German war planning (the Schlieffen Plan) and ultimately contributed to German defeat. A is wrong, the Allied Powers (blue) clearly dominate more territory on the map, including the vast expanse of Russia; the Central Powers are geographically hemmed in. B is wrong, the map shows the Central Powers as a continuous bloc from Germany through Austria-Hungary to Bulgaria and the Ottoman Empire; they are not separated. C is wrong, the map shows the Central Powers surrounded by Allied nations, not neutral nations; neutral nations (gray) appear only on the periphery.
Question 2. Figure 1 shows Italy shaded blue as an Allied Power. A historian should note that this requires which qualification?
- A) Italy was actually a neutral nation throughout the entire war and was incorrectly shaded blue by the mapmaker
- B) Italy had originally been allied with Germany and Austria-Hungary in the Triple Alliance before 1914, but switched to the Allied side in 1915 after being promised territorial gains in the Treaty of London ✓
- C) Italy entered the war on the Allied side in 1914 specifically because Austria-Hungary had seized Italian-speaking territories in the Alps that Italy considered its rightful national territory in the opening weeks of the wider conflict
- D) Italy's blue shading is accurate because Italy had been a formal member of the Triple Entente alongside Britain, France, and Russia since 1882
Explanation: B is correct. Italy's alliance switch is one of WWI's most important diplomatic developments. Before 1914, Italy was a member of the Triple Alliance with Germany and Austria-Hungary, but declared neutrality at the war's outbreak, arguing the alliance was defensive and Austria-Hungary had been the aggressor. In 1915, Italy was induced to join the Allied side through the secret Treaty of London, which promised Italy territorial gains in the South Tyrol, Trieste, Istria, and parts of Dalmatia. The map shows Italy's eventual wartime alignment, not its pre-war alliance membership. A is wrong; Italy did eventually enter the war; it was not neutral throughout. C is wrong; Italy did not enter in 1914; it declared neutrality in 1914 and only joined the Allies in 1915. D is wrong; Italy was not a member of the Triple Entente; it had been in the Triple Alliance with Germany and Austria-Hungary.
Question 3. The alliance system shown in Figure 1 is best understood as a consequence of which broader development in European history before 1914?
- A) Decades of nationalist competition, imperial rivalries, and arms races among European powers that created interlocking military commitments turning a regional crisis into a continental war ✓
- B) The Congress of Vienna's deliberate design of opposing alliance blocs as a balance-of-power mechanism to prevent any single nation from dominating Europe
- C) The Ottoman Empire's rapid military modernization, which threatened the balance of power in southeastern Europe and forced other nations to form defensive alliances in response
- D) The United States' Monroe Doctrine, which prevented American intervention in European affairs and allowed European powers to pursue unchecked military competition without external constraints
Explanation: A is correct. The AP World History CED identifies the causes of WWI as including nationalist competition, imperial rivalries, militarism, and alliance systems. The alliance blocs shown on the map were the product of decades of European power competition: Germany's rise after 1871 alarmed France and Russia, leading them to ally; Britain joined France through the Entente Cordiale (1904) in response to German naval buildup; Austria-Hungary's Balkan conflicts drew in Serbia and Russia. When Archduke Franz Ferdinand was assassinated in 1914, these interlocking commitments transformed a local Austro-Serbian crisis into a continental war within weeks. B is wrong, the Congress of Vienna (1815) created a different concert system; the specific alliance blocs of 1914 formed in the late 19th century through separate diplomatic negotiations, not as a designed feature of the Vienna settlement. C is wrong, the Ottoman Empire was actually in military decline (the "sick man of Europe") by 1914, not undergoing threatening modernization. D is wrong, the Monroe Doctrine addressed the Western Hemisphere, not European affairs; it had no role in shaping European alliance formation.
Question 4. The Ottoman Empire's position as a Central Power, shown in Figure 1, most directly affected which theater of the war?
- A) The Western Front, as Ottoman forces were transported through Germany to reinforce German positions in Belgium and northeastern France
- B) The Eastern Front, as Ottoman and German forces coordinated a joint offensive against Russian positions in Poland and the Baltic states
- C) Allied access to Russia, as Ottoman control of the Bosphorus strait blocked the most direct naval supply route between Britain, France, and their Russian ally, leading to the Gallipoli Campaign ✓
- D) The war's outcome in Africa, as the Ottoman Empire's colonies on the continent were seized by Allied forces in the war's first months, depriving Germany of potential support
Explanation: C is correct. The map shows the Ottoman Empire controlling the Bosphorus and Dardanelles straits, the narrow waterway connecting the Black Sea to the Mediterranean. When the Ottomans entered the war on the Central Powers' side, they closed this route to Allied shipping, cutting off the most direct way to supply Russia with war materials. Russia's inability to receive supplies through the Black Sea contributed to its military difficulties. The Allied response was the Gallipoli Campaign (1915), an attempt to force open the straits, which failed disastrously. A is wrong; Ottoman forces were not transported to the Western Front; they fought in their own theaters in the Middle East and Caucasus. B is wrong, while there was some coordination, the primary impact of Ottoman entry was geographic (controlling the straits), not a coordinated joint offensive on the Eastern Front. D is wrong, the Ottoman Empire had no African colonies; it controlled territories in the Middle East and southeastern Europe.
Question 5. Which of the following developments after WWI most directly reshaped the alliance map shown in Figure 1?
- A) The formation of the League of Nations, which replaced all bilateral alliance agreements among European nations with a universal collective security system
- B) The Bolshevik Revolution in Russia, which caused Russia to withdraw from the war in 1917 but left the overall Allied-Central Powers alliance structure intact for the remainder of the conflict
- C) The United States' entry into the war on the Allied side in 1917, which added American industrial and military power to the Entente without altering the fundamental geographic alliance structure shown in the map
- D) The Paris Peace settlements dismantled the empires of all four Central Powers; Germany reduced, Austria-Hungary dissolved into successor states, the Ottoman Empire partitioned, Bulgaria diminished, redrawing the map of Europe and the Middle East ✓
Explanation: D is correct. The Paris Peace settlements (1919–1923) transformed every state visible on the map as a Central Power. Germany lost territory to France, Poland, Denmark, and Belgium and its overseas colonies. Austria-Hungary was dissolved into Austria, Hungary, Czechoslovakia, Yugoslavia, and parts ceded to Romania and Italy, eliminating one of the map's major red entities entirely. The Ottoman Empire was partitioned through the Treaty of Sèvres and then further transformed by the Turkish War of Independence into the Republic of Turkey, with former Ottoman Arab territories becoming British and French mandates. Bulgaria lost territory to its neighbors. The map shown in Figure 1 was essentially obsolete within five years of the war's end. A is wrong, the League of Nations did not replace bilateral alliances; nations maintained their own military arrangements, and the League's collective security system was weak and ultimately ineffective. B is wrong; Russia's withdrawal did alter the Eastern Front shown on the map; it is not accurate to say the alliance structure remained intact. C is wrong; US entry did not alter the geographic alliance structure; it reinforced the Allied side without changing the fundamental map.